How Can You Customize the Microsoft Office Ribbon
Do you want to
customize your Microsoft Office Ribbon? If yes, then you have come to the right
place because today we are going to show you how you can customize your
Microsoft Office Ribbon as per your choice without any issue or problem. So
let's get started.
Here's how you
can customize your Microsoft Office Ribbon.
How to Add Ribbon Tabs in Microsoft Office?
Follow these
steps to add ribbon tabs in Microsoft Office:
1.
Right-click on any blank part of the ribbon and then tap on the
"Customize the Ribbon" option.
2.
Now navigate to the "Customize the Ribbon" section.
3.
Next, select the "Main Tabs" option from the dropdown
menu.
4.
Now, to add a tab in the ribbon, all you have to do is select that
tab that you want to add from the list (present below the "Customize the
Ribbon" section) and click on "Ok," and it will appear on the
ribbon. For example, to add the "Developer" tab. Select the
"Developer " tab option from the list and click on "Ok."
How to Remove Ribbon Tabs in Microsoft Office?
Follow these
steps to remove ribbon tabs in Microsoft Office:
1.
Right-click on any blank part of the ribbon and then tap on the
"Customize the Ribbon" option.
2.
Now navigate to the "Customize the Ribbon" section.
3.
Next, select the "Main Tabs" option from the dropdown
menu.
4.
Now, to remove a tab from the ribbon, all you have to do is
deselect that tab from the list (present below the "Customize the
Ribbon" section) and click on
"Ok," and it will disappear from the ribbon. For example, to remove
the "Review" tab. Deselect the "Review " tab option from the list and click on
"Ok."
How Can You Customize Individual Ribbon Tabs in
Microsoft Office?
Follow these
steps to customize individual Ribbon tabs in Microsoft Office:
1.
Right-click on any blank part of the ribbon and then tap on the
"Customize the Ribbon" option.
2.
Now navigate to the "Customize the Ribbon" section.
3.
Next, select the "Main Tabs" option from the dropdown
menu.
4.
Now, choose a tab that you want to customize. For example, choose
the "Home" tab.
5.
Next, hit the "+" symbol, which is on the left side of
the "Home" tab option for expanding the list of groups within that
tab.
6.
Now, choose a group. For example, select the "Clipboard"
group.
7.
Next, hit the "Remove" button to remove the
"Clipboard" group from the "Home" tab.
You can also
add a new group to the tabs. To do this:
1.
Navigate to the "Choose commands from section" and
select the "Main Tabs" option from the dropdown menu.
2.
Now select any tab of your choice from the left-hand column and
hit the "+" symbol expanding the list of groups within that tab. For
example, select the "Draw" tab.
3.
Now choose a group. For example, select the "Drawing
Tools" group.
4.
Next, tap on the "Add" option to add the "Drawing
Tools" group in the "Home" tab.
How Can You Add Custom Tabs in Microsoft Office?
Follow these
steps to add custom tabs in Microsoft Office:
1.
Right-click on any blank part of the ribbon and then tap on the
"Customize the Ribbon" option.
2.
Now navigate to the "Customize the Ribbon" section.
3.
Next, select the "Main Tabs" option from the dropdown
menu.
4.
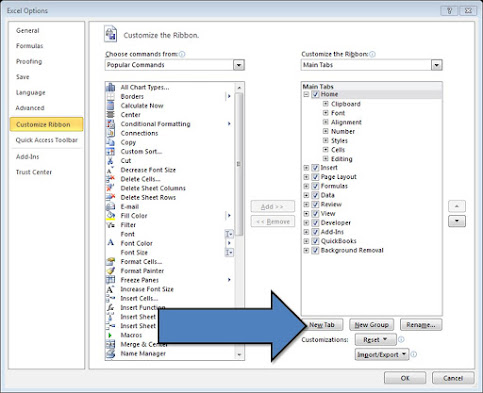
Now tap on the "New" tab button to add a custom tab in
Microsoft Office.
5.
Next, hit the "+" symbol, which is on the left side of
the "Home" tab option for expanding the list of groups within that
tab.
6.
Now select the new tab and click on the "Rename" button
to change its name.
7.
Next, select the group that is in your custom tab and click on the
"Rename" button to change its name.
How to Export Ribbon Customizations in Microsoft
Office?
Follow these
steps to export Ribbon customizations in Microsoft Office:
1.
Right-click on any blank part of the ribbon and then tap on the
"Customize the Ribbon" option.
2.
Now tap on the "Import/Export" button.
3.
Finally, select the "Export all customizations" option
to complete the process.
How to Import Ribbon Customizations in Microsoft
Office?
Follow these
steps to Import Ribbon customizations in Microsoft Office:
1.
Right-click on any blank part of the ribbon and then tap on the
"Customize the Ribbon" option.
2.
Now tap on the "Import/Export" button.
3.
Next, select the "Import customization file" option.
4.
Now select your file (Customization file) and tap on the
"Open" button.
5.
Next, tap " Yes" when prompted by Microsoft Office.
6.
Finally, hit the "Ok" button to complete the process.
Conclusion
There you have
it, a step by step guide that you can follow to customize your Microsoft Office
Ribbon as per your choice. So, carefully follow all the instructions of this
guide, and you will be able to customize your
Microsoft Office Ribbon as per your choice without any issue or problem.
Source :-


Comments
Post a Comment